How are we all doing? I do hope you're all keeping well and finding some much needed calm and sanity in your sewing. When I've not been processing orders, I've been working on some new kits to help inspire my customers, many of who are going through their stash and UFOs very quickly indeed! I also have many new customers who are using this down time to finally get round to learning how to quilt, which is amazing!! My Beginner's Quilt Kits are ideal places to start. I now just have to get on with some new kits to help them develop theirs skills even further... hahah!
Many customers are also finding solace in my EPP cushion kits, not only are they small do-able projects, but as I said in my last post, hand sewing really does help centre the mind and shut out the world for a little while, something we all need at the moment.
Once the EPP is complete on my Cushion and EPP kits, you then have to appliqué the panel onto background fabric, and I have often been asked how to deal with the 'dog ears' and how to get nice sharp points. I have now included this in my kit instructions, but I thought I would also share a little tutorial here.
Once you have centred and pinned or basted your panel onto your background fabric, you will use a tiny slip stitch to sew it down. Knot the end of the thread and bring your needle up from behind the background fabric. Pick up a couple of strands of fabric from the very edge of your pieced panel, then insert your needle directly downwards back into the background fabric. Travel a tiny way along behind the background fabric and bring the needle up again to pick up the edge of the pieced unit again, and as before go straight downwards into the background. The smaller the stitches the more invisible they will be.
When you get to a point, you will have a flap of fabric in the way - these are called 'dog ears' and must be kept in tact - don't be tempted to snip them off, though if they are too large, you can trim them slightly. Fold the 'dog ear' to the left and out of the way and stitch up the folded point.
Add a couple of stitches to strengthen the point, then tuck the dog ear underneath the panel and continue to sew down the next side. As you can see below, this gives you a nice sharp point to your shape.
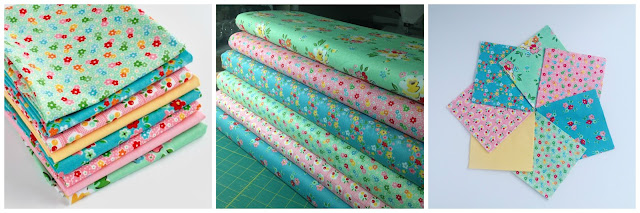
Talking of EPP cushions, I have just released a pair of new kits in Riley Blake's Heart & Soul prints - a Diamond Star and a Hexy, which would make a lovely matching pair on a sofa. Each kit includes all the fabric for the front, pre-cut paper templates, embroidery thread and full instructions. Click here to find out more.
I know many of us have been putting our sewing skills to good use and making much needed PPE supplies for our wonderful workers on the frontline of this terrible pandemic. From scrubs to masks, headbands to scrub bags, I have seen some wonderful fabrics being brought out of the stash for this amazing cause. I myself have been making scrub and shoe bags which will be going to my local hospital James Cook in Middlesbrough.
I really want to crochet some mask extenders too, it's been so long since I crocheted! I have also just heard from a friend that she has the filter fabric needed for face masks available on her online shop Sewing Sanctuary, so maybe that's the next project...
Wishing you all good health, and hours of sewing happiness and calm. xx
Linking up with Midweek Makers and Needle & Thread Thursday
Showing posts with label tutorial. Show all posts
Thursday, 23 April 2020
Thursday, 21 July 2016
No Quarter-Inch Foot? No Worries!
To me, one of the greatest things about being a quilt and kit designer is
encouraging other people to take up this wonderful craft that I love so much,
and I was so happy to inspire a lovely Dutch lady who bought one of my Quick & Easy Beginner’s Quilt Kits at last weekend’s craft fair.
After a long conversation about our love of the Netherlands, and their love of the UK, I managed to ease her worries about making her first quilt - even the fact that the ‘inch’ (rather than metric) was about to take over her life, in particular the scant ¼” seam allowance. I wrote a blog post about checking the accuracy of your seam allowance last year, but thinking about it again, I wanted to add that you don’t actually need a specialist ¼” presser foot, which many machines don’t include, but that you can use your normal straight stitch foot with a little adjustment of the needle. So I have since added to that tutorial which you can read in full here.
Back at Sewmotion HQ…
As I mentioned in my previous blog, we have a new Vintage Rose Strip Set – a 20pc pre-cut made up of Riley Blake’s Backyard Roses with a
couple of co-ordinating Kona Solids.
To celebrate we’re hosting a Giveaway!!! If you haven’t
entered yet, or want to tell a friend about this great chance to win a set of
these new Vintage Rose pre-cuts – just think of that beautiful quilt you could
make – click here to go to my last blog and enter there. The draw will be made
on Wednesday 27th July.
This Sunday (24th July) Sewmotion will be at the Teesmade Festival at Preston Park Museum & Grounds in Stockton-on-Tees. This great family event will be exploring the rich history of heritage skills in the area, with live demonstrations of leather working, willow weaving, pottery, foraging and quilting.
You can then discover the modern-day crafts emerging from Teesside in the Music Room where local makers will be selling their unique handmade items.
Upcoming Events
This Sunday (24th July) Sewmotion will be at the Teesmade Festival at Preston Park Museum & Grounds in Stockton-on-Tees. This great family event will be exploring the rich history of heritage skills in the area, with live demonstrations of leather working, willow weaving, pottery, foraging and quilting.
You can then discover the modern-day crafts emerging from Teesside in the Music Room where local makers will be selling their unique handmade items.
Thursday, 7 July 2016
What can I do with a charm??
Last weekend saw a double whammy of Doughty’s Roadshows, and
I can safely say, fun was had by all!! This was their first visit to my local
quilt group, The Village Quilters in Middlesbrough, and I think my fellow quilters were knocked out by the amount and choice of fabric that Doughty’s bring
with them! Rest assured, Doughty's will be back next year for all you fabric addicts
who were unable to make it. I’d also like to say a huge thank you to those
lovelies from my group who helped so much, bought loads and were just a joy to
work with!
Meanwhile, back at Sewmotion, I’ve just taken delivery of
some real beauties from Riley Blake’s Backyard Roses. As you may know by now,
rather than buying full ranges, I buy a selection from a collection,
mix them with some co-ordinating solids or blenders, and then make them up into pre-cut strip
sets, FQ bundles and charm packs. I then go on to design quilts for patterns and
pre-cut quilt kits using these sets – this is the dream bit of my work… but
leaves me ever so busy!!
Well, as you can imagine, I couldn’t wait to get stuck into
these gems, and soon decided to use this charm pack to make a larger
version of my Square Dance quilt for a new kit. I do love this disappearing
four-patch block and enjoyed a mammoth day yesterday sewing, cutting and
resewing to my heart’s content. I now can’t wait to get them all sewn up and
bordered…
Then my mind started wandering… we all know how versatile
the jelly roll/stripper set is, but what else can be done with a 5” charm
square? Well, quite a lot actually…
You could start off with some simple snowballing, such as my
Snowballs In Spring pattern, or what about this cute Road To Tennessee block –
this tutorial by Andie Johnson Sews is excellent, and shows you the different
effects simple variations can create.
Or maybe just go for the half snowball with this gorgeous Charming Stars pattern from Moda BakeShop - as ever this is a great tutorial with lots of pics.
Then there's always the half-square triangle (HSTs) - this Fresh Diamonds quilt by Samelia's Mum is beautiful, clever placement creates such a pretty design.
Then there's the disappearing nine-patch block - like the four patch above, I love this method of sewing a block and then recutting it to create a whole new block. This pattern tutorial, complete with a great little movie, from Sewn Up is fantastic, just imagine those blocks in solids, or even tones of the same colour...
Finally, you could go really simple and just use the squares with sashing, for this Contact Print Pillow Amanda of Crazy Mom Quilts has quartered the charm squares and added a simple white that makes those scrappy squares just pop! I would love to make a whole quilt like this, maybe with my Backyard Roses... mmmm....
I would like to thank these very generous quilters who have offered these beautiful patterns for free - please go and explore their blogs and say hello.
Do you know about our Newsletter?
As well as these blogs, we also have a Newsletter to keep you up to date with our events, new patterns & products plus special subscriber offers. Subscribe today and get 10% off all our FQs bundles.
Today we're linking up with;
Let's Bee Social at Sew Fresh Quilts
NTT at My Quilt Infatuation
Finish It Up Friday at Crazy Mom Quilts
Thursday, 5 May 2016
A four-patch wonder, and a new All Squared Up kit
One of the many reasons I love patchwork and quilting so much - apart from the gorgeous colours, textures, stroking factor (you know exactly what I mean!) - is how there is always something new to learn. Clever quilters around the world share new techniques and discoveries every day - we're very generous like that - so I just had to share this little gem.
Now, I'm sure this isn't an original idea, and that it probably eeked into my subconcious from Pinterest, YouTube or a lovely fellow blogger - who knows where! But while I was developing new quilt patterns that feature charm squares, I was having a play and came up with this very quick and nifty way of creating two four-patch blocks in one go... You can see the full tutorial with plenty of pics here.
While not fabric-playing, I’ve finally finished my latest All Squared Up quilt, this time in Sevenberry’s Japanese prints with a little cream Kona thrown in for good measure.
This pre-cut kit includes all the 2½” x 44” strips, borders, binding and thread you need to complete the quilt top, you just need wadding and backing. A couple of lovely customers who are just beginning their wonderful quilting adventure, have recently told me that these kits are great for them, as they don’t have to worry about fabric selection, or even all of the cutting, they can just get stuck in, which was so great to hear and this is exactly what I’m aiming for!
Just when I thought I would move onto a new quilt design, these Cotton Candy beauties from Dashwood turn up… How amazing would they look in an All Squared Up quilt!?!
On a sad note, I may have mentioned that my next craft fair was at Stokesley Town Hall this Saturday. Unfortunately, the organisers, Yorkshire Craft Fairs, have decided to call it a day and cease trading, mainly down to poor footfall and low re-bookings from stallholders. It’s a great shame this fair is now cancelled, I was really looking forward to another sunny weekend in North Yorkshire!
Anyway, I have been looking at other events further a field… more news on those soon! For now, I'm linking up with Sew Fresh Quilt's Let's Bee Social, Needle and Thread Thursday over at My Quilt Infatuation and Finish It Up Friday at Crazy Mom Quilts - come over and say Hi!
Thursday, 7 April 2016
Designing a quilt back - and a Giveaway!
When working on my latest quilt kit, I realised just how
much I love a pieced quilt back! I know there are more pretty extra-wide
backings available than ever before, but there's just something about
using some of the same fabrics you've used on the front, on the back, and
sometimes, depending on the quilting, you can end up with two quilts in one!
It does make me laugh when some people see my quilt backs and then step back in complete awe, as if I'd just scaled Kilamanjaro! Let me tell you folks, pieced backings are really not that difficult! Or should I say, they're only as difficult as you make them - with a little maths and some added creativity, you can make your quilt backs just as beautiful as your fronts!
Read my new tutorial on designing and piecing your own quilt back - hopefully you will be inspired to try your own!
Elsewhere, there is still plenty of time to enter our free Giveaway! To celebrate springtime (well, it seemed so last week anyway) we're giving away a set of our new Mono Flowers Strip Set and Charm Packs. Featuring Riley Blake's Dot & Dash fabrics together with Kona Solids, this monochrome colourway would make a stunning modern quilt, with just a hint of yellow for the spring sunshine (she says hopefully...)
You can enter in a three ways – the more ways you enter, the more chances you have to win:
a) Like our Facebook page, and leave a comment on the top Post telling me which is your favourite quilting pre-cut and why. If you have quilty friends, why not Share this post and spread the word!
b) Subscribe to our monthly Newsletter to be kept up to date with our latest products, pattern releases and events.
c) Leave a comment below on this Blog post telling me which is your favourite quilting pre-cut and why.
The draw will close at midnight on Wednesday 13th April 2016, so good luck everyone! For full term and conditions of this competition, click here.
This week's I'm linking up with;
It does make me laugh when some people see my quilt backs and then step back in complete awe, as if I'd just scaled Kilamanjaro! Let me tell you folks, pieced backings are really not that difficult! Or should I say, they're only as difficult as you make them - with a little maths and some added creativity, you can make your quilt backs just as beautiful as your fronts!
Read my new tutorial on designing and piecing your own quilt back - hopefully you will be inspired to try your own!
You can enter in a three ways – the more ways you enter, the more chances you have to win:
a) Like our Facebook page, and leave a comment on the top Post telling me which is your favourite quilting pre-cut and why. If you have quilty friends, why not Share this post and spread the word!
b) Subscribe to our monthly Newsletter to be kept up to date with our latest products, pattern releases and events.
c) Leave a comment below on this Blog post telling me which is your favourite quilting pre-cut and why.
The draw will close at midnight on Wednesday 13th April 2016, so good luck everyone! For full term and conditions of this competition, click here.
This week's I'm linking up with;
* Lorna's Let's Bee Social at Sew Fresh Quilts
* Needle And Thread Thursday at My Quilt Infatuation
* and Tips & Tutorials Tuesday at Late Night Quilter - come over, say hello and get inspired!
* Needle And Thread Thursday at My Quilt Infatuation
* and Tips & Tutorials Tuesday at Late Night Quilter - come over, say hello and get inspired!
Thursday, 4 February 2016
My first movie!
I must have a hundred different ideas floating around my
head at the moment, what with more samples for John Louden (more about that
next week), my new Hexy Cushion Kits to get into the world, and the patterns,
kits and designs begging to be put to paper, my brain can get pretty
overwhelmed! So this week, as it was my birthday, I decided to learn
something new just to add to the madness!
Here is my first attempt at filmmaking! Haha! Not the best
quality I know – I used an old digi-camera I’d forgotten we owned, and an even
older version of iMovie. Still, I’m quite pleased with how it turned out,
though that tune now drives me insane after hearing it so many times!
In my first film venture, I wanted to share my
favourite technique for glue-basting shapes for English paper-piecing, a method that features in our new Hexy Cushion Kits – great gifts for Mother’s Day
(6th March) – click below for more details.
There’s still time to enter our free GIVEAWAY – for a chance
to win a Hexy Cushion Kit of your very own – you’ll be addicted to EPP in no
time – leave a comment below telling me which craft you find the most addictive
– entries close at midnight, Friday 5th March, and a winner will be
chosen at random.
Thursday, 21 January 2016
The Tricky Issue of a Zip
Over the years I’ve become addicted to making
cushions. They come together much faster than quilts, and they're also a good way of
trying out a new technique. However, one thing I’ve never really enjoyed is
inserting the zip at the end - I’ve spent a few happy hours designing, sewing and quilting my
cushion front… only to then have to finish it off
with a backing and a closing of some sort, which I find so tedious!!
Recently however, I have come across two fantastic tutorials that have made my life
easier and that give my cushions a more professional finish. The first is
by blogger Veni Vidi Vicky, I love this method and have used it on my
T-T-Teesssider and Geometric cushions. I particularly like how the coloured zip
adds extra interest and becomes a part of the design rather than been hidden
away.
Vicky’s blog is full of gorgeous projects and great tutorials, though
sadly she doesn’t seem to have written anything for a while. Anyway, you can
click here for her very clear tutorial on how to insert a zip into a fully quilted pillow.
For my latest couple of cushions, which will hopefully be available as kits
soon, I wanted to try something different, and started looking at how to insert
a covered zip. Thanks to our wonderfully generous online sewing community, I
soon found this gem from S.O.T.A.K Handmade. Svetlana is another of my
favourite bloggers with amazing taste in fabrics, many of which feature in her
free tutorials, including beautiful quilts, cute little pouches, and funky
coasters. She also shares her method of installing a zipper in a pillow cover –
I found this method so quick and easy and finished off my Hexy cushions in no
time at all. I will show you more about these cushions soon, but don't you just love the difference between machine quilting and hand quilting? I used Aurifil of course, with a 50wt in the machine, and a lovely 12wt for the hand sewing which was new to me and worked really well!
So if you’re looking for a smart finish to your cushions or pillows, check out
these lovely ladies for easy-to-follow tutorials, as well as some gorgeous
inspiration.
Elsewhere in the quilting world…
I just had to share this free Arrows Quilt pattern from Emmajané of Stitch and Pieces, featured on The Village Haberdashery’s blog, The Daily Stitch, this
week. Not only is this a gorgeous quilt, but the planning and mental arithmetic
that has gone into working this baby out is amazing! I thought my Bargello was
bad enough, but looking at the cutting instructions and the layout plan, I
imagine this took many hours to come together, so offering the quilt pattern
for free is incredibly generous, thank you Emmajané!
Doughty’s latest special offer features one of my favourite ranges, the
linen-look cottons. As you may know, I use these versatile fabrics quite a lot
in my projects and handmade gift items, and find them to not only add extra
strength to pencil cases and purses, but they also add lovely texture to
quilted cushions and hand-embroidered panels. I stocked up on some cute elephants,
and just couldn’t resist these cute polka dots!
Don't forget, as well as these weekly blogs, we also send out a monthly Newsletter. Subscribe here to hear news of our latest products, pattern releases and special offers.
This week I'm linking up with Let's Bee Social over at Sew Fresh Quilts, come and say hello!
Wednesday, 13 January 2016
Quilting by YouTube
Like many quilters, I’m often asked “where did you learn to
quilt?” Unlike many quilters, I wasn’t taught by a wise matriarch in the
family. My nan knitted a lot, and sometimes embroidered, while my mum made
clothes for me and my sister when we were young, and then later on knocked up
the odd pair of curtains… both miles away from quilting! They did
however teach me the basics in sewing, from hand-embroidered tapestries to
sewing dolls clothes on mum’s old and extremely heavy Jones sewing machine.
I was introduced to quilting in my teens by a friend, but it wasn’t until a few years ago that this new addiction took hold, the more fabric I saw, the more I wanted for my stash, the more techniques I heard about, the more I wanted to learn – hence the size of my book collection!
However, after all a while, buying a book for every new idea soon becomes expensive, so where else could I go? Then I discovered YouTube!
Now for the uninitiated, rest assured YouTube is not just videos of kids being drunk, or nutters doing strange stunts of their bikes, or weird music videos by performing arts students. Yes, there are plenty of those, but YouTube really has developed into an amazing teaching vehicle, and what’s more, it’s totally free! So these days you can learn anything, from how to apply your make-up, and get into (and out of) a million yoga poses, to how to play a musical instrument - and even how to make enough handmade quilts to keep you stitching for a lifetime.
If you visit YouTube.com and enter ‘quilting’ into the search box, you will come up with nearly 200,000 videos - that should keep you busy! Let’s face it, no quilter has the time to trawl through all these, so try entering ‘quilting tutorials’, or ‘quilting for beginners’. With still so many to choose from, I thought I would share some of my favourites, starting with the Missouri Quilt Company.
Those of you familiar with Twitter or Facebook may have come
across these short and concise films already, click here to view their YouTube home page. Owner and master quilter Jenny
takes us through all kinds of quilting projects, including beginners’ classes,
simple quilt blocks, tutorials on
different skills and techniques, and features on the latest tools and gadgets. These mini-lessons are well filmed, easy to
hear and understand, and are the perfect length for a coffee break!
Another company that produces similar film tutorials is the Fat Quarter Shop.
Again, there are so many tutorials to choose from, including using short-cuts to
create beautiful quilt blocks, and how to use new notions on the market.
Quilting expert and presenter Kimberly is often joined by guests from the
quilting world to show off their patterns, techniques or to just chat about
their creative lives, so if you’re looking for some inspiration from the
experts, this is the place.
Another of my favourites is Cozy Quilt Designs, in particular their monthly ‘Strip Club’ . Addicted quilter Daniela Stout owns the Cozy Quilt Shop in San Diego (where I plan to visit one day) where she developed this great idea of making up strip packs from her bolts, and then designing patterns to go with them. Once a month she presents her latest pattern to her group and films the demonstration. Not only is Daniela pretty inspiring, but she’s also entertaining to watch!
So if you have exhausted your book
collection, and that of the local library, why not have a browse on YouTube,
you may be pleasantly surprised at what you find!
As well as these weekly blogs, we also issue a monthly newsletter full of news of our latest products, special offers and new pattern realeases. Click below to subscribe.
If you're up for even more quilt inspiration pop over to Sew Fresh Quilt's Let's Be Social and Linky Tuesday over on Freemotion by the River and say hello.
Tuesday, 10 November 2015
Dog Gone Cute Voting is Open
I'm off to the Dublin Quilt Show in a couple of hours, but just wanted to let you know that participants of the wonderful Dog Gone Cute QAL over on Sew Fresh Quilts, have been invited to link up their beautiful creations, with the chance of winning some great prizes.
Remember these little babies?? If not, you can read all about my wall hanging here.
You get three votes in total and a week to place them, so why not pop over and spread some puppy love.
Remember these little babies?? If not, you can read all about my wall hanging here.
You get three votes in total and a week to place them, so why not pop over and spread some puppy love.
Wednesday, 30 September 2015
Sewing an accurate scant quarter-inch seam allowance
It’s hard to
believe (well for me anyway) that the world wide web, that we take so much for
granted these days, wasn’t around when I first fell in love with quilting. When
I first started in my teens, I taught myself the basics from books and
magazines, using templates cut from cereal packets, and cutting everything with
scissors!! It wasn’t until I came back to this wonderful craft in my twenties that
I discovered the huge wealth of information, generously given for free, on the
hundreds of quilting websites and blogs that now exist. I have learnt so much
from these wonderful quilters, and continue to do so.
Many of these
talented people write blogs where they share their latest creations as well as
the latest tips and tricks to help us all in our projects. You can see some of them in the right-hand column in My Blog List. It is these people I
would like to share with you in this series of how-to blogs. I already include
links in the “I’m stuck, help!!” section on sewmotion, but I thought I would
highlight some of the essentials to help those new to quilting.
This week we’re
starting with the scant ¼” seam allowance. Now, I have to admit, I have learnt
something new today… I like learning new things, but this was a bit of a surprise…
my ¼” stitch on my machine is actually not a ¼”!! I know, shocking! Well in
fact, it is a ¼”, but not a scant ¼”. You will come across the term scant in
most quilt patterns, and it means that you need to sew about a thread’s width
shy of ¼” to give room for the thread and the fold in the seam.
So, for the
purposes of this blog, I followed a couple of online tutorials to check my own
seams. The first is from the lovely Amy Ellis at Amy’s Creative Side. She uses
a ¼” foot on her machine, whereas I use my standard foot with the needle moved
to the right (the ¼” stitch setting on my Janome).
If your machine doesn't have this setting, most machines allow you to move the needle to the required position. To set this up for a ¼” seam, place a quilter's ruler on top of the lowered feed dogs so the ruler lies nice and flat (above left). Align the right edge of the ruler with the right edge of your presser foot. Slowly lower your needle so that it's not quite touching the ruler, then move the needle until it lines up with the first ¼” line on the ruler. Now you can use the edge of your normal presser foot as a guide to run the edge of your fabric against. If you would like a clearer mark, you can stick a thick piece of tape onto to your machine to give you more of a run up - The Fat Quarter Shop has a great video showing more about this guide here.
So back to checking for scantness...
If your machine doesn't have this setting, most machines allow you to move the needle to the required position. To set this up for a ¼” seam, place a quilter's ruler on top of the lowered feed dogs so the ruler lies nice and flat (above left). Align the right edge of the ruler with the right edge of your presser foot. Slowly lower your needle so that it's not quite touching the ruler, then move the needle until it lines up with the first ¼” line on the ruler. Now you can use the edge of your normal presser foot as a guide to run the edge of your fabric against. If you would like a clearer mark, you can stick a thick piece of tape onto to your machine to give you more of a run up - The Fat Quarter Shop has a great video showing more about this guide here.
So back to checking for scantness...
Following Amy’s tutorial I cut a few 2½” fabric
strips, then used the first two to sew a ¼” seam as normal. However, when I came
to check my block size, I was out! This explains so much! It may seem to you
that this tiny amount wouldn’t matter, hey, its only a smidgen out right?
Wrong! If you imagine this amount out on say 20 blocks… that smidgen soon adds
up to more than an inch and will cause problems if you're following a pattern.
Now, I probably
haven’t noticed this before as I’ve used the same stitch consistently throughout my sewing, so I
wouldn’t have been out when matching seams and rows to each other. However,
when I’ve come to measure the whole quilt I do sometimes come up short. As I am normally following my own pattern, I've just gone with it, but if this is your first quilt, or if you're enjoying some complicated piecing, you'll want to get it right.
So, following Amy
again, I went back to the machine and moved my needle .8mm to the right,
setting it from 8.3 to 9, and tried again.
And what do you know, it worked
perfectly! I’ll just have to now remember change this setting every time I sew.
If you don’t have a
¼” foot or stitch on your machine, this tutorial from Connecting Threads explains
how to place tape down on the front of your machine to use as a guide for your
fabric. Once you have tried this method, I suggest you then do as Amy did and
press your seams open to measure your block, just to make sure your seam is a
scant one.
Today I'm linking up with Tip & Tutorials Tuesday over at Late Night Quilter, and Sew Fresh Quilt's Let's Bee Social - come and join in the fun!
Subscribe to:
Posts (Atom)